Nginx 配置
配置说明
nginx.conf配置文件:
#user nobody;
worker_processes 1; # worker 的数量
#error_log logs/error.log;
error_log logs/error.log;
#error_log logs/error.log notice;
#error_log logs/error.log info;
#pid logs/nginx.pid;
events { # 事件
worker_connections 1024; # 每个 worker 的最大连接数
}
http {
include mime.types;
default_type application/octet-stream;
log_format main '$remote_addr - $remote_user [$time_local] "$request" '
'$status $body_bytes_sent "$http_referer" '
'"$http_user_agent" "$http_x_forwarded_for"';
access_log logs/access.log main;
sendfile on;
#tcp_nopush on;
#keepalive_timeout 0;
keepalive_timeout 65;
gzip on;
# server {
# listen 80;
# server_name localhost;
#charset koi8-r;
#access_log logs/host.access.log main;
# location / {
# root html;
# index index.html index.htm;
# }
#error_page 404 /404.html;
# redirect server error pages to the static page /50x.html
#
# error_page 500 502 503 504 /50x.html;
# location = /50x.html {
# root html;
# }
# proxy the PHP scripts to Apache listening on 127.0.0.1:80
#
#location ~ \.php$ {
# proxy_pass http://127.0.0.1;
#}
# pass the PHP scripts to FastCGI server listening on 127.0.0.1:9000
#
#location ~ \.php$ {
# root html;
# fastcgi_pass 127.0.0.1:9000;
# fastcgi_index index.php;
# fastcgi_param SCRIPT_FILENAME /scripts$fastcgi_script_name;
# include fastcgi_params;
#}
# deny access to .htaccess files, if Apache's document root
# concurs with nginx's one
#
#location ~ /\.ht {
# deny all;
#}
# }
include /etc/nginx/conf.d/*.conf;
}
说明:
- 使用
#注释 - 单引号或双引号引用字符串,使用
\转移字符 - 使用
;表示行配置结束 - 指令
include引用其它配置文件,支持使用通配符* - 变量引用
$var {}引用配置块http {}HTTP 块
内置预定义变量
参考:http://nginx.org/en/docs/varindex.html
$arg_PARAMETERGET 请求中变量名 PARAMETER 参数的值$argsGET 请求中的参数,例如foo=123&bar=456;这个变量只可以被修改$binary_remote_addr二进制码形式的客户端地址$body_bytes_sent传送页面的字节数$content_length请求头中的 Content-length 字段$content_type请求头中的 Content-Type 字段$cookie_COOKIEcookie COOKIE 的值$document_root当前请求在 root 指令中指定的值$document_uri与$uri相同$host请求中的主机头(Host)字段,如果请求中的主机头不可用或者空,则为处理请求的 server 名称(处理请求的 server 的 server_name 指令的值)。值为小写,不包含端口$hostname机器名使用 gethostname 系统调用的值$http_HEADERHTTP 请求头中的内容,HEADER 为 HTTP 请求中的内容转为小写,-变为_(破折号变为下划线),例如:$http_user_agent(Uaer-Agent 的值)$http_user_agent客户端 agent 信息$http_cookie客户端 cookie 信息$sent_http_HEADERHTTP 响应头中的内容,HEADER 为 HTTP 响应中的内容转为小写,-变为_,例如:$sent_http_cache_control, $sent_http_content_type$is_args如果$args设置,值为"?",否则为""$limit_rate这个变量可以限制连接速率$nginx_version当前运行的 nginx 版本号$query_string与$args相同$remote_addr客户端的 IP 地址$remote_port客户端的端口$remote_user已经经过Auth Basic Module验证的用户名$request_filename当前连接请求的文件路径,由 root 或 alias 指令与 URI 请求生成$request_body请求的主要信息。在使用 proxy_pass 或 fastcgi_pass 指令的 location 中比较有意义$request_body_file客户端请求主体信息的临时文件名$request_completion如果请求成功,设为"OK";如果请求未完成或者不是一系列请求中最后一部分则设为空$request_method这个变量是客户端请求的动作,通常为 GET 或 POST$request_uri这个变量等于包含一些客户端请求参数的原始 URI,它无法修改,请查看$uri 更改或重写 URI,包含请求参数的原始 URI,不包含主机名,如:/foo/bar.php?arg=baz$scheme所用的协议,比如 http 或者是 https,比如rewrite ^(.+)$ $scheme://example.com$1 redirect$server_addr服务器地址,在完成一次系统调用后可以确定这个值,如果要绕开系统调用,则必须在 listen 中指定地址并且使用 bind 参数$server_name服务器名称$server_port请求到达服务器的端口号$server_protocol请求使用的协议,通常是 HTTP/1.0 或 HTTP/1.1$uri请求中的当前 URI(不带请求参数,参数位于 args),不同于浏览器传递的 args,不同于浏览器传递的request_uri的值,它可以通过内部重定向,或者使用 index 指令进行修改。uri 不包含主机名,如/foo/bar.html
自定义变量
在 sever,http,location 中使用 set 定义变量
set $变量名 变量值可见范围:
location中声明的变量中对该location块可见server中声明的变量对server块和server中的子块可见http中声明的变量对http块和http中的子块可见
location
location Web 服务的 URI,对应 RESTful API,格式:
location [= | ~ | ~* ...] uri { ... }说明:
=表示精确匹配,优先级也是最高的^~表示 uri 以某个常规字符串开头,匹配 URI 的前半部分~表示区分大小写的正则匹配~*表示不区分大小写的正则匹配!~表示区分大小写不匹配的正则!~*表示不区分大小写不匹配的正则/通用匹配,任何请求都会匹配到
优先级:
= > ^~ > ~ / ~* / !~ / !~* > /来源限制策略
- [参考]http://nginx.org/en/docs/http/ngx_http_access_module.html
location / {
    deny  172.20.1.1;
    allow 172.21.0.0/16;
    deny  all;
}
proxy_pass
location /pass {
    proxy_set_header    Host            $host;  # 转发原始请求的 host 头部,即域名,域名在代理时透传到后端的服务器
    proxy_set_header    X-Real-IP       $remote_addr;  # 多次代理获取 IP
    proxy_set_header    X-Forwarded-For $proxy_add_x_forwarded_for;

    proxy_pass http://backend;      # 转发到 upstream

    # 定义不从缓存中获取响应的条件。如果字符串参数中至少有一个值不为空且不等于 "0",则不会从缓存中获取响应
    proxy_cache_bypass  $cookie_nocache $arg_nocache$arg_comment;
}
说明:
proxy_pass转发 HTTP、HTTPS 服务fastcgi_pass转发 fastcgimemcached_pass转发 memcached
Basic 认证代理
通过配置 Header 实现
proxy_set_header Authorization "Basic ....";隐藏 header
proxy_hide_header Access-Control-Allow-Origin;upstream
配置 server 指令的上游服务器域名或 IP 地址:
upstream backend {
    least_conn;                  # 负载均衡策略,包括:least_conn/hash/ip_hash,默认加权轮训(round robin)
    server 127.0.0.1:80;         # server 配置上游服务器
    server 172.20.0.1 weight=2;  # weight/backup/down/max_fails 服务器的状态
    server 172.20.0.2 backup;

    keepalive 60;
}
rewrite
rewrite在 Nginx 中实现 URL 重写功能,nginx 编译时需要指定 ngx_http_rewrite_module,该指令通过正则表达式获取匹配服,并按照顺序依次对 URL 进行匹配和处理- 作用范围:
server{},location{},if{} - 使用场景
- 根据 SEO 或用户体验调整 URL
- 把动态 URL 地址伪装成静态地址
- 让旧域名的访问跳转到新域名上
- 根据特殊变量、目录、客户端的信息等进行 URL 跳转
- 格式如下
rewrite regex replacement [flag];说明:
-
rewriteURL 重写的指令 -
regex匹配 URI 的正则表达式 -
replacement将regex正则表达式匹配到的内容替换成replacement -
flag标记支持如下值:last匹配后继续向下匹配新的规则break匹配后不再匹配后面的任何规则redirect返回 302 临时重定向,浏览器跳转新的 URL 地址permanent返回 301 永久重定向,浏览器跳转新的 URL 地址
-
示例
rewrite ^/(.*) http://www.baidu.com/$1 permanent;说明:
regex为^/(.*)匹配完整的域名和后面的路径地址replacement为http://www.baidu.com/1,其中1是取regex部分(.*)的内容,即若匹配成功后跳转到的 URLflag是permanent,代表永久重定向的含义
日志
格式:
    # 日志格式
    # log_format name format_str;
    log_format  main  '$remote_addr - $remote_user [$time_local] "$request" '
                     '$status $body_bytes_sent "$http_referer" '
                     '"$http_user_agent" "$http_x_forwarded_for"';

		# log_format main '[$time_local] $proxy_protocol_addr "$http_referer" "$http_user_agent"'; # [时间] 客户端地址 引用页 用户代理信息

    # 定义使用 8KB 的缓存,每秒刷新一次
    # access_log path [format [buffer=size] [flush=time]];
access_log logs/access.log main buffer=8k flush=1s;log_format日志格式upstream_http_xxx获取proxy_pass相关参数
- 日志的分类:
access_log记录 HTTP/HTTPS 的访问日志error_log记录错误日志
常见的 map 配置
http {

    # 用于设置在 HTTP 升级时如何处理连接,在 HTTP 升级时将连接升级为 HTTP/2
    map $http_upgrade $connection_upgrade {
        default upgrade; # 如果$http_upgrade存在且非空,则将$connection_upgrade设置为upgrade(用于WebSocket连接)
        ""      close; # 如果$http_upgrade为空,则将$connection_upgrade设置为close(关闭连接)
    }

	    # 用于处理代理协议头(Proxy Protocol),确保正确地传递客户端的真实 IP 地址
    map $proxy_protocol_addr $proxy_forwarded_elem {
        ~^[0-9.]+$        "for=$proxy_protocol_addr"; # 如果$proxy_protocol_addr是IPv4地址(匹配正则表达式~^[0-9.]+$),则将其格式化为for=$proxy_protocol_addr
        ~^[0-9A-Fa-f:.]+$ "for=\"[$proxy_protocol_addr]\""; # 如果$proxy_protocol_addr是IPv6地址(匹配正则表达式~^[0-9A-Fa-f:.]+$),则将其格式化为for="[$proxy_protocol_addr]"
        default           "for=unknown"; # 如果地址格式不匹配上述两种情况,则设置为for=unknown
    }

    # 用于处理 HTTP Forwarded 头;map $http_forwarded $proxy_add_forwarded: 使用map指令将现有的HTTP Forwarded头($http_forwarded)与新生成的代理协议元素($proxy_forwarded_elem)结合,生成新的$proxy_add_forwarded变量
    map $http_forwarded $proxy_add_forwarded {
        # 如果$http_forwarded已经存在且格式正确,则将新生成的$proxy_forwarded_elem追加到现有的$http_forwarded头中
        "~^(,[ \\t]*)*([!#$%&'*+.^_`|~0-9A-Za-z-]+=([!#$%&'*+.^_`|~0-9A-Za-z-]+|\"([\\t \\x21\\x23-\\x5B\\x5D-\\x7E\\x80-\\xFF]|\\\\[\\t \\x21-\\x7E\\x80-\\xFF])*\"))?(;([!#$%&'*+.^_`|~0-9A-Za-z-]+=([!#$%&'*+.^_`|~0-9A-Za-z-]+|\"([\\t \\x21\\x23-\\x5B\\x5D-\\x7E\\x80-\\xFF]|\\\\[\\t \\x21-\\x7E\\x80-\\xFF])*\"))?)*([ \\t]*,([ \\t]*([!#$%&'*+.^_`|~0-9A-Za-z-]+=([!#$%&'*+.^_`|~0-9A-Za-z-]+|\"([\\t \\x21\\x23-\\x5B\\x5D-\\x7E\\x80-\\xFF]|\\\\[\\t \\x21-\\x7E\\x80-\\xFF])*\"))?(;([!#$%&'*+.^_`|~0-9A-Za-z-]+=([!#$%&'*+.^_`|~0-9A-Za-z-]+|\"([\\t \\x21\\x23-\\x5B\\x5D-\\x7E\\x80-\\xFF]|\\\\[\\t \\x21-\\x7E\\x80-\\xFF])*\"))?)*)?)*$" "$http_forwarded, $proxy_forwarded_elem";
        # 如果$http_forwarded不存在或格式不正确,则仅使用新生成的$proxy_forwarded_elem
        default "$proxy_forwarded_elem";
    }
		...
}
header
丢失请求头名下划线
nginx 的请求头名默认采用中划线的命名规则,下划线 默认会自动忽略掉,通过配置如下选项支持(参考):
underscores_in_headers on;x-request-id
为请求添加 X-Request-ID header
server {
  add_header X-Request-ID $request_id;
}
代理 body 的大小
解决 nginx 上传文件时日志出现 a client request body is buffered to a temporary file 问题
    client_body_buffer_size     10M;
    client_max_body_size        10M;
参考:
- http://nginx.org/en/docs/http/ngx_http_core_module.html#client_body_buffer_size
- http://nginx.org/en/docs/http/ngx_http_core_module.html#client_max_body_size
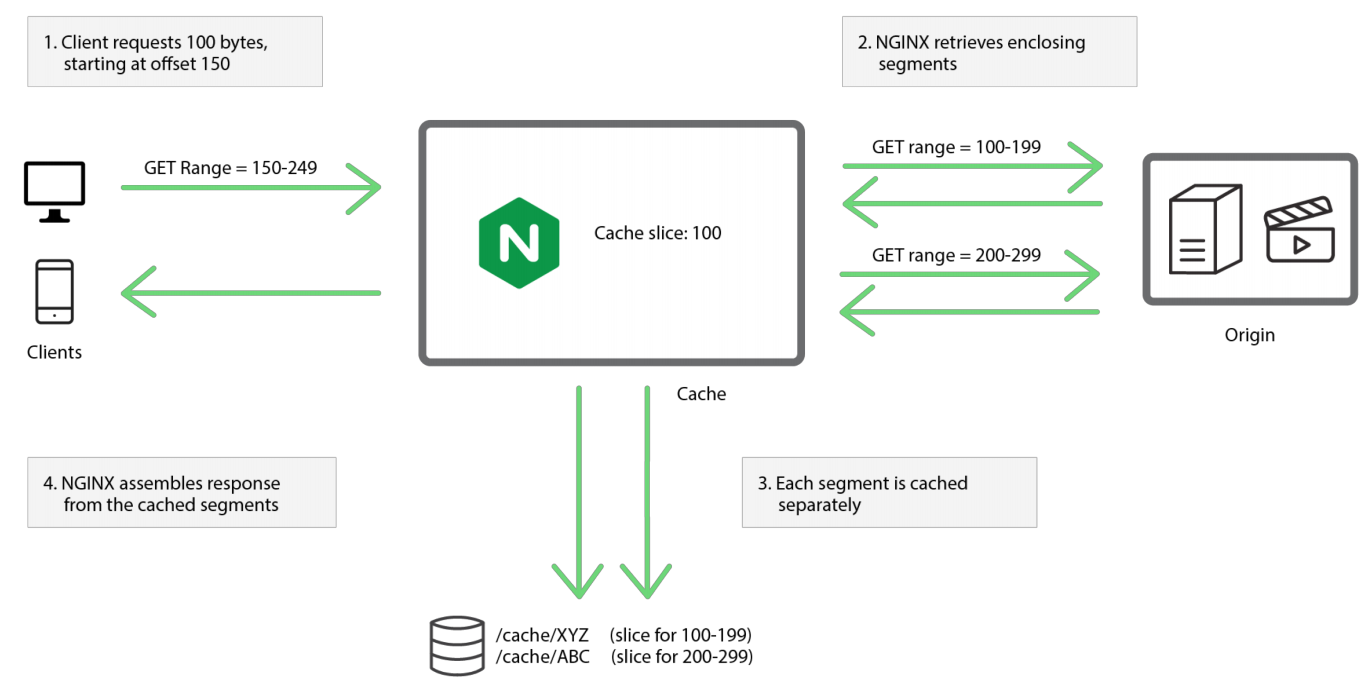
分片 slice
- Nginx 的 slice 模块可以将一个请求分解成多个子请求,每个子请求返回响应内容的一个片段
- Nginx-1.9.8 中新增加的一个模块
ngx_http_slice_module实现,编译需加上--with-http_slice_module参数 - http 请求通过
Range头控制请求分片的大小
http {
    include       mime.types;
    default_type  application/octet-stream;
    sendfile        on;
    keepalive_timeout  65;

    proxy_cache_path /tmp/nginx/cache levels=1:2 keys_zone=cache:100m;
    server {
        listen       8087;
        server_name  localhost;
        location / {
            slice 1m;
            proxy_cache cache;
            proxy_cache_key $uri$is_args$args$slice_range;
            proxy_set_header Range $slice_range;
            proxy_cache_valid 200 206 1h;
            #proxy_set_header Range $http_range;
            proxy_pass http://127.0.0.1:8080;
        }
        error_page   500 502 503 504  /50x.html;
        location = /50x.html {
            root   html;
        }
    }
}
ssl_protocols
server {
    server_name www.xiexianbin.cn;
    ssl_ciphers          ECDHE-RSA-AES256-GCM-SHA384;
    ssl_protocols       TLSv1 TLSv1.1 TLSv1.2;
		...
}
keepalive_timeout
- 参考
- 0 表示每次都创建一个链接
- 65 表示链接复用,最大时间为 65 秒
http {
    keepalive_timeout  65;
		...
}
proxy_protocol
Proxy Protocol 是一种用于在代理服务器(如负载均衡器或 CDN)和后端服务器(如 Nginx)之间传递客户端连接信息的协议。
当您使用负载均衡器或代理服务器时,客户端的原始 IP 地址和端口信息通常会在到达后端服务器时丢失,因为后端服务器看到的连接来源是代理服务器的 IP。
Proxy Protocol 的作用 就是通过在实际连接数据之前添加一个包含客户端真实 IP 地址和端口、以及代理服务器 IP 和端口的元数据头部,来解决这个问题。这样,后端服务器(Nginx)就能准确获取到发起请求的客户端的真实信息。
-
主要用途和优势
- 获取客户端真实 IP: 这是最主要的功能。对于需要根据客户端地理位置、进行访问控制、或进行日志记录和分析的应用程序至关重要。
- 兼容性: 它适用于 TCP 和 UNIX 域套接字连接,可用于 HTTP、HTTPS、SMTP、MySQL 等各种协议的四层(TCP)负载均衡。
- 简单有效: 协议头部格式简单,易于解析。
要在 Nginx 中启用 Proxy Protocol,您需要在接收代理连接的 listen 指令中添加 proxy_protocol 参数。
- HTTP/HTTPS (L7 - 应用层),在
http块内的server配置中:
http {
    # ... 其他配置
    server {
        # 监听端口,并开启 proxy_protocol
        listen 80 proxy_protocol;
        listen 443 ssl proxy_protocol;

        # ... 其他配置
    }
}- TCP/UDP (L4 - 传输层) 在
stream块内的server配置中:
stream {
    # ... 其他配置
    server {
        # 监听端口,并开启 proxy_protocol
        listen 12345 proxy_protocol;

        # ... 其他配置
    }
}
注意:
- 前端代理必须开启: 只有当前端负载均衡器(如 AWS ELB/ALB、HAProxy 或其他 Nginx 实例)发送 Proxy Protocol 头部时,后端 Nginx 开启此功能才有效。
- 版本要求: Nginx 开源版本 1.13.11 及以后版本支持 Proxy Protocol v2。旧版本可能仅支持 v1。
在 Nginx 开启 proxy_protocol 之后,可以通过特定的变量来获取客户端的真实 IP:
- 对于 HTTP 请求,Nginx 会自动将客户端真实 IP 写入
$remote_addr变量,取代代理服务器的 IP。 - 在需要记录日志或传递给后端应用时,直接使用
$remote_addr即可。
proxy_ssl_server_name
- https://nginx.org/en/docs/http/ngx_http_proxy_module.html#proxy_ssl_server_name
- 解决:peer closed connection in SSL handshake (104: Connection reset by peer) while SSL handshaking to upstream
proxy_ssl_server_name 是 Nginx 在作为 反向代理 并且与 上游服务器 (Upstream Server) 建立 HTTPS (SSL/TLS) 连接时的一个非常重要的指令。
它的主要作用是:启用 SNI (Server Name Indication)
当您设置 proxy_ssl_server_name on; 时,Nginx 会执行以下操作:
- 发送目标域名: Nginx 在与上游服务器进行 SSL/TLS 握手时,会在 Client Hello 消息中包含上游服务器的 主机名 (Server Name)。
- 目的: 这使得上游服务器能够识别客户端(即 Nginx)想要连接的是哪个域名。
- 场景: 这在 一个 IP 地址/端口上托管了多个 HTTPS 网站(即上游服务器使用了基于域名的虚拟主机)时是 至关重要 的。上游服务器可以根据这个域名信息返回正确的 SSL/TLS 证书。
总结其核心价值:
- 默认行为: Nginx 默认是不发送 SNI 的(即
proxy_ssl_server_name off;)。 - 开启作用: 开启后,如果您的上游服务器是基于 SNI 配置的,它就能正确地识别请求并返回正确的证书,确保 Nginx 能够成功建立 HTTPS 连接。
简单的说: 它是让 Nginx 在做 HTTPS 反向代理时,能够 正确地告诉上游服务器它想访问哪个域名,从而应对上游服务器使用 一机多站 的 HTTPS 配置。
s 常用配置示例:
server {
    listen 80;
    server_name example.com;

    location / {
        # 代理到上游的 HTTPS 地址
        proxy_pass https://backend_server_ip;

        # *** 重点:启用 SNI ***
        proxy_ssl_server_name on;

        # 可选:如果需要验证上游证书的合法性
        # proxy_ssl_verify on;
        # proxy_ssl_trusted_certificate /path/to/ca.crt;
    }
}
示例
user www-data;
worker_processes 4;
error_log /var/log/nginx/error.log;
pid /var/run/nginx.pid;
events {
worker_connections 1024;
}
http {
include /etc/nginx/mime.types;
access_log off;
default_type application/octet-stream;
sendfile on;
tcp_nodelay on;
tcp_nopush off;
reset_timedout_connection on;
server_tokens off;
# Cache 100G worth of packages for up to 1 month
proxy_cache_path /var/lib/nginx/pypi levels=1:2 keys_zone=pypi:16m inactive=1M max_size=100G;
# Multiple server definitions makes nginx retry on errors
upstream pypi {
server pypi.python.org:443;
server pypi.python.org:443;
keepalive 16;
}
gzip on;
gzip_types application/json text/css text/javascript;
gzip_proxied any;
gzip_vary on;
server {
listen 80 default_server;
server_name pypi.example.com;
root /var/www;
proxy_cache pypi;
proxy_cache_key $uri;
proxy_cache_lock on;
proxy_cache_use_stale error timeout updating http_500 http_502 http_503 http_504;
proxy_http_version 1.1;
proxy_set_header Host pypi.python.org;
proxy_set_header Connection "";
proxy_set_header Accept-Encoding "";
# Rewrite any http redirects to use relative to proxy
proxy_redirect ~https?://pypi.python.org(.*) $1;
location / {
# Replace any reference to actual pypi w/ caching proxy
sub_filter 'https://pypi.python.org' $scheme://$host;
sub_filter_once off;
proxy_pass https://pypi;
proxy_cache off;
}
location ^~ /simple {
# Make sure URI ends with /
rewrite ^(.*[^/])$ $1/ break;
add_header X-Cache2 $upstream_cache_status;
proxy_cache_valid any 5m;
proxy_pass https://pypi;
}
location ^~ /packages {
add_header X-Cache2 $upstream_cache_status;
proxy_cache_valid any 1M;
proxy_pass https://pypi;
}
}
}
- 使用示例
# 如果客户端请求的文件名存在,就做什么动作
if ( -f $request_filename) {.....}
# 如果客户端请求方法是POST上传,做什么动作
if ($request_method = POST) {.....}
# 如果客户端的浏览器名称里面带有MSIE字符就做什么操作
if ($http_user_agent ~ MSIE) {
rewrite ^(.*)$ /msie/$1 break;
}
# 不同浏览器访问不同结果(实现不同客户端(PC,安卓,IOS))访问不同的后端实例
if ($http_user_agent ~ Firefox) {
rewrite ^(.*)$ /firefox/$1 break;
}
if ($http_user_agent ~ Chrome) {
rewrite ^(.*)$ /chrome/$1 break;
}
# 防止盗链
location ~*\.(gif|jpg|png|swf|flv)${
valid_referers none blocked www.xiexianbin.cn *.80.xyz;
if ($invalid_referer) {
rewrite ^/(.*) https://www.xiexianbin.cn/images/forbidden.png;
}
}
# 禁止访问以 /data 开头文件
location ~ ^/data {
deny all;
}
# 设置某些类型文件的浏览器缓存时间
location ~ .*.(gif|jpg|jpeg|png|bmp)$ {
expires 30d;
}
location ~ .*.(js|css)$ {
expires 1h;
}
F&Q
The plain HTTP request was sent to HTTPS port
出现该现象是由于采用 http 协议访问 https 的端口导致的,建议修改访问协议为 https,或配置 error_page 修复,HTTP 状态码 497 HTTP Request Sent to HTTPS Port
server {
  listen        443 ssl;
  server_name   xxx;

  # If they come here using HTTP, bounce them to the correct scheme
  error_page 497 https://$server_name:$server_port$request_uri;

  ...
}
或
server {
    listen       80
    listen       443 ssl;
    server_name blog.yoodb.com;

    if ($scheme = http) {
        return 301 https://$host$request_uri;
    }

    charset UTF-8;
    ssl_certificate           certs/x.pem;
    ssl_certificate_key       certs/x.key;
    ssl_session_timeout       5m;
    ssl_ciphers               ECDHE-RSA-AES128-GCM-SHA256:ECDHE:ECDH:AES:HIGH:!NULL:!aNULL:!MD5:!ADH:!RC4;
    ssl_protocols             TLSv1.2 TLSv1.3;
    ssl_prefer_server_ciphers on;

    location / {
        proxy_set_header Host $host;
        proxy_set_header X-Real-IP $remote_addr;
        proxy_set_header X-Forwarded-For $proxy_add_x_forwarded_for;
        proxy_set_header X-Forwarded-Proto https;
				proxy_redirect   http:// https://;
        proxy_pass http://127.0.0.1:8080;
    }
}
408 Request Timeout
408 Request Timeout表示服务器想要将没有使用的连接关闭,一般由于 client_body_timeout 和 client_header_timeout 超时导致,默认都是 60s。
client_body_timeout:读取客户端请求正文的超时,如上传大文件client_header_timeout:读取客户端请求头部的超时
优化配置:
    client_header_timeout 120;
    client_body_timeout 120;
400 Request Header Or Cookie Too Large
配置 header buffers,参考
    # Default: large_client_header_buffers 4 8k;
    # Context: http, server
    large_client_header_buffers 4 16k;
413 Request Entity Too Large
配置 client_max_body_size 属性,配置示例如下
http {
    client_max_body_size 1024m;
}

server {
    client_max_body_size 1024m;

    location / {
        client_max_body_size 1024m;
    }
}
499 Client Closed Request
- 客户端关闭请求,即客户端请求服务端,服务端还没有返回给客户端,客户端主动关闭连接
- Used in Nginx logs to indicate when the connection has been closed by client while the server is still processing itsrequest, making server unable to send a status code back
- 相关配置
proxy_ignore_client_abort on
proxy 100-continue
采用 curl 命令时,若请求提大于 1024 bytes 时,nginx 默认返回 100 的状态码,可以通过配置 Expect header 解决(参考)
curl -X POST -H "Expect:" http://<url> -F data=@myfileproxy_read_timeout
upstream prematurely closed connection while reading response header from upstream一般是由于上游读取响应时,而过早关闭连接,通常需要调整 proxy_read_timeout 和上游服务器的超时时间
an upstream response is buffered to a temporary file
proxy_buffering on;
proxy_buffer_size 128k;
proxy_buffers 32 32k;
proxy_busy_buffers_size 128k;
proxy_temp_file_write_size 128k;
参数说明:
proxy_buffers:定义缓冲区的数量和大小proxy_buffer_size:设置用于存储响应头的缓冲区大小proxy_busy_buffers_size:定义在缓冲区繁忙时可以使用的缓冲区大小,通常为 proxy_buffers 总大小的两倍proxy_max_temp_file_size:设置单个请求可以使用的临时文件的最大大小proxy_temp_path:指定临时文件的存储路径。确保该路径磁盘空间充足
日志出现 \x22
使用 escape,参考
log_format main escape=json '[$time_iso8601]|$remote_addr|$request_method|$request|$status|$body_bytes_sent|$request_time|$request_body|'
                '"$http_referer"|"$http_user_agent"|$http_x_forwarded_for|'
                '"$upstream_addr"|$upstream_response_time|'
                '$upstream_cache_status|$scheme|$http_user_agent';
worker_connections are not enough
error.log 中出现如上错误,解决需修改 nginx.conf:
worker_rlimit_nofile  65535;
events {
    worker_connections  10240;
}
并在 /etc/security/limits.conf 中添加以下参数
* soft    nofile    65536
* hard    nofile    65536